AndroidのRemote Serviceについて(+作り方)
ローカルサービスについては“AndroidのServiceについて”に書いたので、ここではリモートサービスについて書き留めておく。ここで取り上げるリモートサービスとはサービスとサービスを呼び出すクライアントが別々のアプリケーションとして動作しているケースを指す。(後で実際に動かしてみたサンプルを載せておくが、サービスとクライアントは別々のアプリケーション、別々のパッケージとして動かしている)。
基本的はローカルもリモートも同じサービスには変わりないのでstartServiceでサービスを起動、stopServiceでサービスを終了、bindServiceでサービスとの接続を確立、unbindServiceでサービスとの接続を切断、というのは全く同じ(詳しくは“AndroidのServiceについて”参照)。
ただ、リモートサービスの場合は、サービスのオブジェクトを直接参照したりメソッドを呼び出したりできないのでAIDL(Android Interface Definition Language)と言う仕組みを利用する。AIDLはRPCとデータのmarshall(セッション層とプレゼンテーション層に相当する模様、総称してIPC:interprocess communication)を実現するコードを自動生成してくれる便利ツールのようなもんだ。クライアントとサービス間で利用するデータやメソッドの“型”だけを定義しておくとAIDLが自動的にプロセス間でやりとりするためのプログラムを生成してくれる。(つまり、AIDLがなければユーザが自分でIPCのためのコードを書かなければならない。)なお、メソッドの本体はAIDLで自動生成するというわけには行かないのでサービス本体の中で定義しなければならない。
以下にサンプルを紹介しておく。(最初にEclipseを使ったサービスとクライアントの作成方法を紹介して、プログラム本体はその後にリストしておく。)
なお、このサンプルは次のような構成となっている。
- サービス:クライアントからの依頼でステータスバーに“△”と“▽”のNotificationを交互に出す。サービス自身は専用のプロセス(アプリケーション)として実行する。Viewは持たない(デーモンの様な感じ)。パッケージ名は com.example.android.remote_service。
- クライアント:Viewを持ち画面に1つだけボタンを配置する。ボタンを押すとサービスを呼出し、アイコンの向きを変えてもらう。パッケージ名は com.example.android.remote_service_client 。
- サービスとクライアントのインタフェースはIChageIconというオブジェクトで実現する。これをAIDLで定義する。
この様に非常に単純でクライアントとサービスを合わせても100行ちょっと程度。あくまでもリモートサービスの実装の方法を知るためのもの。
■ サービスのアプリケーションを作成する
Eclipseを起動し、[File]ー[New]ー[Android Project]を選択する。

New Android Projectダイアログでは、
- プロジェクト名(Remote_Service)
- ビルドターゲット
- アプリケーション名(RemoteService)
- パッケージ名(com.example.android.remote_service)
を入力するところまではいつもの通りだが、サービス専用のアプリケーションにするので、Create Activityのチェックは外し、アクティビティ名も空白のままで[Finish]をクリックする。

プロジェクトを作成したら、パッケージエクスプローラでAndroidManifest.xmlを選択し、右側のエディタで[Application]タブを選択する。そして[Add...]ボタンをクリックする。

作成する要素を選択するダイアログが表示されるので“Service”を選択して、[OK]をクリックする。

エディタ画面に戻ったら、今作成したServiceを選択されていることを確認し、右側のNameラベルのリンクをクリックする。

New Java Classのダイアログが出たら、ソースフォルダ、パッケージ名を確認の上、クラス名を入力(RemoteService)し、“Inherited abstract methods”にチェックして[Finish]をクリックする。

するとサービスの雛形が作成され、自動的にエディタ画面へ移る。(マニフェストは“保存”しておくこと。)

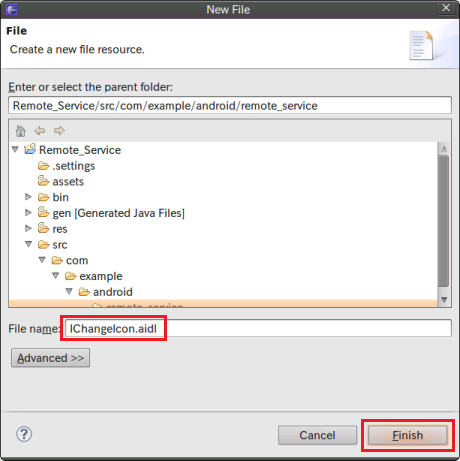
次にAIDLファイルを作成する。左側のパッケージエクスプローラで、“src/com.example.android.remote_service”を選択し、マウスのボタンからコンテキストメニューを出す。コンテキストメニューの[New]ー[File]を選択する。

New Fileダイアログが出たらファイル名(IChangeIcon.aidl)を入力し[Finish]をクリックする。

IChangeIcon.aidlのエディタ画面へ移るので、AIDL定義を書き込み、保存する。

すると、Eclipseが自動的にAIDLファイルをJavaのプログラムに変換し、genフォルダのパッケージの下にIChangeIcon.javaが作られる。(内容は見ることができるが、genフォルダの下にあるファイルは基本的に修正しない。)

以上の準備ができたら、以下のプログラムをエディタで書き込む。
- IChangeIcon.aidl(上で既に作成・保存)
- RemoteService.java
- AndroidManifest.xml(サービスのIntent Filterを追加する、のだがインテントフィルタ無しでもOKだった)
そして、
- ステータスバーに表示するアイコンをres/drawableの下に作成する(私の場合は、drawable-hdpiとdrawable-mdpiに置いたが、1ヶ所でも良いだろう。)アイコンの画像はAndroid SDKの中のサービスのデモで使った三角のアイコン(/home/android/android-sdk/samples/android-8/ApiDemos/res/drawable-mdpi/stat_sample.png)とそれを画像エディタで上下逆さまにしたものを使った。
- 不要なファイルの削除。RemoteServiceはデーモン的に動くので画面の定義や、ランチャでのアイコンは不要となる。そこでicon.png、main.xml、string.xmlは削除してしまった。
以上の作業を終了するとプロジェクトの構成はこんな感じとなる。

後は Android Aplicationとして動かせばいい。

これでサービスをAVDにインストールできたが、サービスを呼び出すクライアントを起動しない限りはサービスも起動することはない。
■ サービスRemoteServiceのソースリスト
AndroidManifest.xml
<?xml version="1.0" encoding="utf-8"?>
<manifest xmlns:android="http://schemas.android.com/apk/res/android"
	package="com.example.android.remote_service" android:versionCode="1"
	android:versionName="1.0">
	<application>
		<service android:name=".RemoteService">
			<intent-filter>
				<!-- バインドの対象となるサービスで提供するインターフェース -->
				<action android:name="com.example.android.remote_service.IChangeIcon" />
				<!-- 特定のクラスを指定せずにサービスを指定するアクションコード -->
				<action android:name="com.example.android.remote_service.REMOTE_SERVICE" />
			</intent-filter>
		</service>
	</application>
</manifest>
IChangeIcon.aidl
package com.example.android.remote_service;

interface IChangeIcon {
    void flipIcon();
}RemoteService.java
package com.example.android.remote_service;

import android.app.Notification;
import android.app.NotificationManager;
import android.app.PendingIntent;
import android.app.Service;
import android.content.Intent;
import android.os.IBinder;
import android.os.RemoteException;

public class RemoteService extends Service {

	private NotificationManager mNM = null;
	private Notification notification = null;
	private final int NOTIFICATION_ID = R.drawable.stat_up;
	PendingIntent pIntent = null;

	private boolean stat_up = true;

	@Override
	public void onCreate() {
		super.onCreate();
		pIntent = PendingIntent.getActivity(this, 0, new Intent(IChangeIcon.class.getName()), 0);
		notification = new Notification(R.drawable.stat_up, "Up and Down", System.currentTimeMillis());
		notification.setLatestEventInfo(this, "RemoteService", "Up and Down ICON ", pIntent);

		mNM = (NotificationManager)getSystemService(NOTIFICATION_SERVICE);
		showNotification(stat_up);
	}

	@Override
	public void onDestroy() {
		mNM.cancel(NOTIFICATION_ID);
		super.onDestroy();
	}

	private final IChangeIcon.Stub mBinder = new IChangeIcon.Stub() {
		public void flipIcon() throws RemoteException {
			stat_up = !stat_up;
			showNotification(stat_up);
		}
	};

	@Override
	public IBinder onBind(Intent intent) {
		return mBinder;
	}

	private void showNotification(boolean isUp) {
		if (isUp)
			notification.icon = R.drawable.stat_up;
		else
			notification.icon = R.drawable.stat_down;
		mNM.notify(NOTIFICATION_ID , notification);
	}
}
■ クライアントのアプリケーションを作成する
クライアントはサービスとは別のアプリケーションとして作る。先ずはいつもの通りEclipseの[File]ー[New]ー[Android Project]を選択して新しいプロジェクト作る。

New Android Projectダイアログでは、
- プロジェクト名(Remote_Service_Client)
- ビルドターゲット
- アプリケーション名(Client)
- パッケージ名(com.example.android.remote_service_client)
- アクティビティ名(Client)
を設定して[Finish]をクリックする。

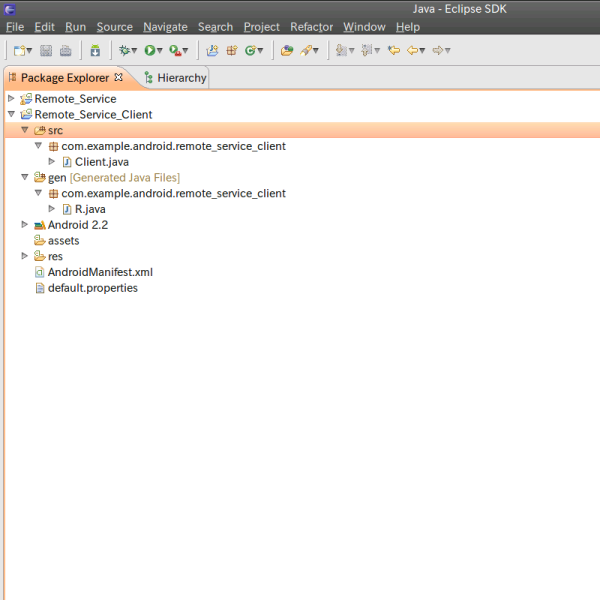
Remote_Service_Clientのプロジェクトを作成した直後では、srcとgenの下にはパッケージ com.example.android.remote_service_client だけが存在している。

今回は、srcの下にパッケージcom.example.android.remote_serviceとその下にIChangeIcon.aidlを置く必要がある。次のような手順でプロジェクトRemote_Serverからリンクを張る。
まず、パッケージエクスプローラでsrcを選択し、マウスの右クリックからコンテキストメニューを表示する。[New]ー[Package]を選択する。

Java PackageダイアログでNameにcom.example.android.remote_serviceを入力し[Finish]をクリックする。

するとsrcの下にパッケージcom.example.android.remote_serviceが出来る。(自動的にgenの下にもcom.example.android.remote_serviceが作成される。)次に今作成したcom.example.android.remote_serviceを選択してマウスの右クリックからコンテキストメニューを表示する。[New]ー[File]を選択する。

Fileダイアログが出たら[Advanced>>]をクリックし、“Link to file ...”をチェックする。次にリンク先のIChangeIcon.aidlへのパスを直接入力するか、[Browse...]を使って入力する。(~/workspace/Remote_Server/src/com/example/android/remote_server/IChangeIcon.aidl)

するとサービスのところで作成したIChangeIcon.aidlへのリンクが張られ、クライアントのsrc/com.example.android.remote_serviceの下にもIChangeIcon.aidlが現れる。(自動的にgenの下にもIChangeIcon.aidlを展開したIChangeIcon.javaが作られる。)

あとは、通常のアクティビティを作る要領で作業を進める。main.xmlでボタン等のViewの定義をしてからClient.javaのプログラムを作成し、出来上がったら Android Applicationとして起動する。

なお、サービスのところで作成したIChangeIcon.aidlをリンクを使いクライアントにもコピーして来たが、クライアントを作成するのにサービスのファイルが必要なるというのが今ひとつ解せない。他人が作ったサービスを使うアプリケーションを作成するので、そのサービスの一部のソースがないと構築できないことになってしまう。クライアントからはIChangeIconクラスの情報があれば良いはずなのでIChangeIcon.aidlをコピーするのではなく、サービスのbinをオブジェクトライブラリをしてビルドパスに入れてみた。コンパイルは出来き、AVDにインストールもできるのだが、クライアントを起動すると“java.lang.NoClassDefFoundError: com.example.android.remote_service.IChangeIcon”という例外が発生しクライアントが止まってしまう。この辺りはもう少し調べて見たい。
■ クライアントClientのソースリスト
AndroidManifest.xml
<?xml version="1.0" encoding="utf-8"?>
<manifest xmlns:android="http://schemas.android.com/apk/res/android"
	package="com.example.android.remote_service_client"
	android:versionCode="1" android:versionName="1.0">
	<application android:icon="@drawable/icon" android:label="@string/app_name">
		<activity android:name=".Client" android:label="@string/app_name">
			<intent-filter>
				<action android:name="android.intent.action.MAIN" />
				<category android:name="android.intent.category.LAUNCHER" />
			</intent-filter>
		</activity>
	</application>
</manifest>
res/layout/main.xml
<?xml version="1.0" encoding="utf-8"?>
<LinearLayout xmlns:android="http://schemas.android.com/apk/res/android"
	android:orientation="vertical"
	android:layout_width="fill_parent"
	android:layout_height="fill_parent"
	>
	<Button
		android:layout_width="fill_parent"
		android:layout_height="wrap_content"
		android:id="@+id/button_flip"
		android:text="flip !"
		android:onClick="onClick"
		/>
</LinearLayout>
res/values/strings.xml
<?xml version="1.0" encoding="utf-8"?>
<resources>
    <string name="app_name">Client</string>
</resources>Client.java
package com.example.android.remote_service_client;

import com.example.android.remote_service.IChangeIcon;
import android.app.Activity;
import android.content.ComponentName;
import android.content.Context;
import android.content.Intent;
import android.content.ServiceConnection;
import android.os.Bundle;
import android.os.IBinder;
import android.os.RemoteException;
import android.view.View;

public class Client extends Activity {

	IChangeIcon mService = null;

	private ServiceConnection mConnection = new ServiceConnection() {

		public void onServiceConnected(ComponentName name, IBinder service) {
			mService = IChangeIcon.Stub.asInterface(service);
		}

		public void onServiceDisconnected(ComponentName name) {
			mService = null;

		}
	};

	@Override
	public void onCreate(Bundle savedInstanceState) {

		super.onCreate(savedInstanceState);
		setContentView(R.layout.main);

		// startService(new Intent(IChangeIcon.class.getName()));
		bindService(
			new Intent(IChangeIcon.class.getName()),
			mConnection,
			Context.BIND_AUTO_CREATE
			);
	}

	@Override
	protected void onDestroy() {
		unbindService(mConnection);
		// stopService(new Intent(IChangeIcon.class.getName()));
		super.onDestroy();
	}

	public void onClick(View view) {
		try {
			if (mService != null)
				mService.flipIcon();
		} catch (RemoteException e) {
			// Nothing TODO: handle exception
		}
	}
}
出来上がったクライアントを起動すると以下のような画面になる。

ここで[Flip !]というボタンをクリックすると、ステータスバーの三角アイコンの向きが変わる。

なお、ここでメモったプログラムは Remote Service の“基本動作”を理解するためのスケルトン(骨組み)に過ぎない。実際のアプリケーションではAIDLはもっと複雑になってくる。この辺については、もしまた機会があったらメモっておきたいと思うが、“AndroidのBinderによるプロセス間のメソッド呼び出し”で、より実践的な使い方が紹介されている。(しかし、京都マイクロコンピュータって懐かしい響きだなぁ。確か京大の学生が作った会社じゃなかったかなぁ。)

